-
Click the New button to display the New Site slide-out panel.

-
Fill in the Properties fields. The Description field is not required. If the selected Country does not have a State/Province, the State/Province drop-down menu will say No data.
-
Click the Select Entity button.
-
In the Select Member window, under the Hierarchy tab, use the tree navigation to select an entity. Alternatively, use the Search tab to search for an entity. Click the OK button. You cannot select multiple entities.
-
-
Under Security, use the Access Group drop-down menu to assign an access group to the site. See Access.
-
The Enabled checkbox is selected by default. To disable the site, deselect the Enabled checkbox.
-
Under Purchased Energy, select an Electric Grid and a Heat and Steam source.
-
To select an Electric Grid, click the Edit button. In the Select a Grid slide-out panel, select a grid from the Suggested Electric Grids table. Click the Done button.
-
To select a Heat and Steam source, click the Edit button. In the Select a Heat/Steam Source slide-out panel, select a source from the Suggested Heat and Steam Sources table. Click the Done button.
NOTE: Available Electric Grid and Heat and Steam options will display based on the location provided by the user. If there is more than one grid or source for that location, the user can choose from narrowed lists of Suggested Electric Grids and Suggested Heat and Steam Sources.
-
-
Click the Save button if you do not want to add any factor groups to the site. To add factor groups to a new site, click Save and Add Factors.
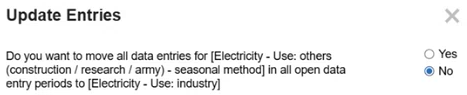
If you change the supplier for a site that already has data entered, you are asked if you want the data from the original supplier to migrate to the new supplier. If you select Yes, the data is moved in all open data entry periods. If you select No, then both suppliers display on the Home page for data entry. If you do not migrate the data, the data you enter for both suppliers will aggregate on the report. You cannot change supplier data if the Workflow is completed or if the profile is in the Completed status.
Import Sites

Use the Download and Import buttons to download a site entry template and bulk import site data.
To import site data, complete the following steps:
-
Click the Download button. Fill in all required template columns.
Column Description Name Enter a name for the site. Description (Optional) Enter a description for the site. Entity This columns has a drop-down menus enabling you to select a valid entity. It populates all members in the cube's Entity dimension. To review your cube selection, see Global Options. Country This column has a drop-down menu enabling you to select a valid country. State/Province Enter a state or province. Invalid states or provinces do not display in the grid when the file is imported. City Enter a city. Access Group This column has a drop-down menu enabling you to select a valid access group. It populates all ESG Reporting and Planning access groups. To review your access groups, see Access.
Select (Unassigned) if you do not need an access group assigned to the site.
-
When you complete the template, click the Import button.
-
In the File Upload window, click the BROWSE button to open File Explorer.
-
Select the template and click the Open button.
-
Click the Upload button.
-
The Spreadsheet Import Report slide-out panel displays showing the number of entries added to the Sites grid. Review the entries and click the Close button. If there are validation errors, the Spreadsheet Import Report slide-out panel displays a compiled list of errors.
NOTE: All imported sites are enabled by default.


